Following proper sprayer tank clean-out procedures will ensure your herbicide products are performing optimally, while preventing crop injury. Even a small amount of herbicide left in a sprayer tank can harm sensitive crops. A thorough cleansing of the sprayer system, including the spray tank, lines, sump, pump, filters and nozzles, particularly when switching from one pesticide to another, or from one crop type to another (or within crop types), is necessary to protect crops from injury.
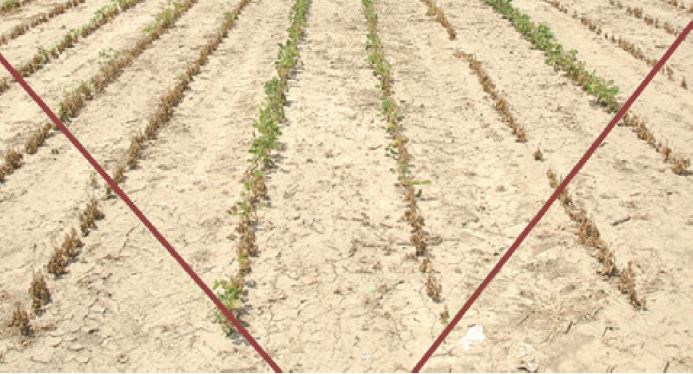
Sensitive crop types, such as canola, are at high risk for damage from herbicide residues. Odd growth patterns, misshapen plants, dead plants on only one side of the field and patterns in the field (such as a “V”) are all signs of sprayer contamination.1
 Boom contamination “V-shaped” pattern.
IMPORTANCE OF TANK CLEAN-OUT
Tank mixing herbicides is becoming more and more common on Canadian farms, so proper tank clean-out is more important than ever. Petroleum-based herbicides or adjuvants may trap Group 2 herbicides on polyethylene tank walls when mixed together. These Group 2 residues dissolve into the tank-mix solution when water is added, which may injure non-Group 2 canola if it is next to be sprayed.
STEPS FOR EFFECTIVE SPRAYER CLEAN-OUT
Keeping an empty, clean sprayer system helps prevent corrosion and stops herbicide residues from drying and hardening inside the system. However, if using the same herbicide product the following day, flushing the system with water is sufficient. Additionally, after the use of glyphosate on its own, flushing with water is also adequate.
When switching crops or herbicide products, follow these procedures for effective sprayer clean-out (unless product label guidelines specify otherwise)
- While in the field, spray the tank until it’s empty.
- Drain and flush tank, booms, boom ends and hoses with clean water. Remove any hardened herbicide solution.
- Fill the tank with some water. Agitate and spray solution for five minutes.
- Power wash residue from tank walls.
- Fill the tank with some water and add one of the following tank cleaning agents per 100 litres of water:
- 1 litre of household ammonia (at least 3% ammonia)
- 0.25 litre of cleaning detergent (e.g., Agral® 90 or AgSurf®). The type of cleaner required will depend on the product being used. Refer to the product label.
- Commercial tank cleaner (e.g., All Clear®, CleanOut™ or Klenz-R™)
- Circulate the cleaning solution for 15 minutes. Operate sprayer long enough to fill boom lines and nozzles with solution.
- Spray out the solution. Dispose rinsate by spraying it over a field in accordance with product label and local laws.
- Remove and clean nozzles, screens and strainers in a bucket of water and cleaning agent.
- Rinse entire spraying system once more with water for at least five minutes.
IMPORTANCE OF TRIPLE RINSING IN THE ROUNDUP READY® XTEND CROP SYSTEM
XtendiMax® herbicide with VaporGrip® Technology is a low-volatility, liquid dicamba formulation developed for use with Roundup Ready 2 Xtend® soybeans in the Roundup Ready® Xtend crop system.
Minute quantities of dicamba can cause injury to sensitive crops, including soybean varieties not tolerant to the herbicide. Sprayer systems must be cleaned using a triple rinse procedure after use of XtendiMax® herbicide.
 Tank contamination. Uniform injury across field.
Follow the seven steps below for the recommended XtendiMax® triple rinse clean-out.
1st Rinse
- After spraying, immediately drain sprayer system.
- Flush tank, hoses, booms, boom ends and nozzles with clean water.
2nd Rinse
- Prepare a cleaning solution with an ammonia-based commercial cleanser.
- Remove and soak all strainers, screens and filters in the solution (overnight is best).
- Fill sprayer tank with cleaning solution, agitate and thoroughly recirculate for at least 15 minutes. Remove all visible deposits from the sprayer system.
- Flush hoses, spray lines and nozzles with cleaning solution for at least one minute.
3rd Rinse
- Repeat steps 1 and 2 once. Dispose of all rinsate in compliance with applicable laws and regulations.
Click Here To Download a PDF Version of this Article
Sources:
1 How to Identify a Spray Contamination Issue.” Canola Watch. Issue 14. 17 Jun. 2015. Web.
2 Data provided by Dr. Tom Wolf, an Agriculture and Agri-Food Canada research scientist. Special thanks to Dr. Tom Wolf for his expertise provided on sprayer tank clean-out procedures.